The beginner's guide to the most important photography terms!
Check out our handy glossary of photography terms you need to know!
If you're just starting out in photography, no doubt you're reading around the subject and brushing up on the terminology. A lot of the terms used can be quite daunting for beginner photographers, but don’t worry! We've highlighted some of the most important photography terms that you're likely to come across and what they mean.
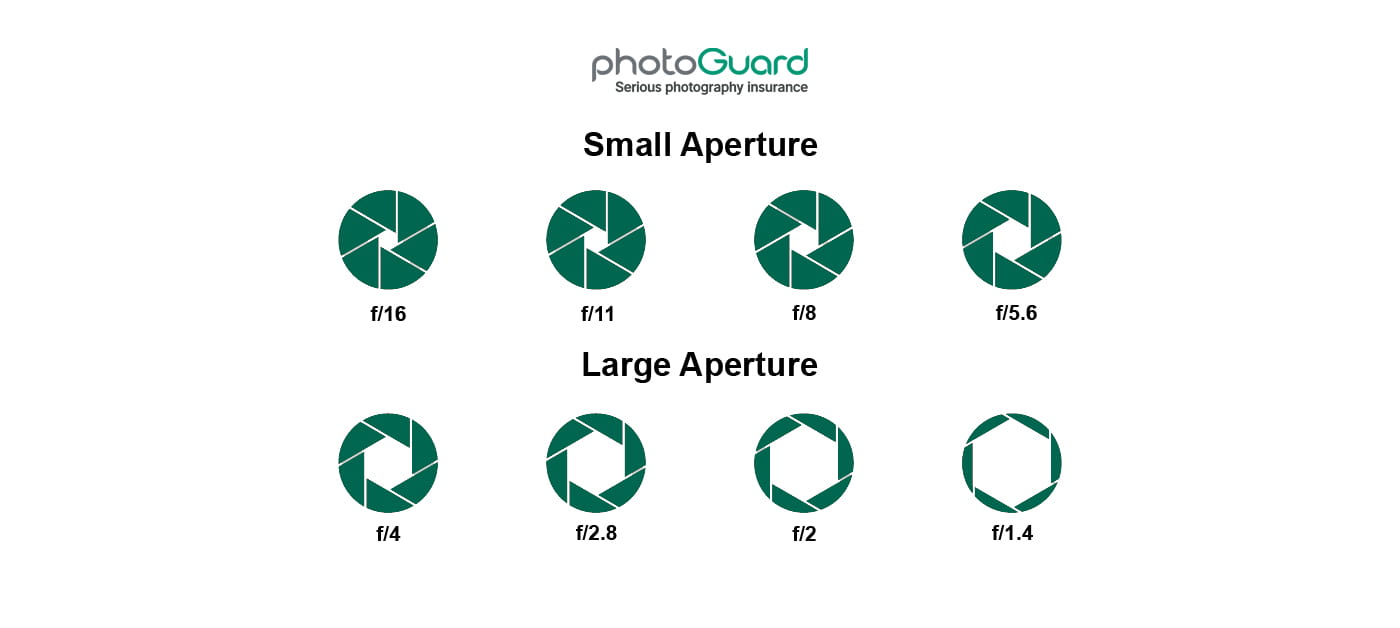
Aperture
Aperture refers to the size of the opening through which light passes into your camera lens. Aperture is measured using "f/stops" - but you'll usually see it expressed as a number between 1 and around 22. This might be a whole number or a decimal. The lower the f/stop number, the larger the aperture - i.e. the more light that can get through the lens.
A larger aperture leads to a higher exposure. Conversely, a high f/stop number means a smaller aperture, or less light passing into the lens, and therefore a lower exposure. The same shot taken at different apertures can look very different!
Depth of Field
As well as exposure, the aperture will also change the depth of field you can expect in your photos. The depth of field relates to how much of your shot is in focus. A large depth of field means that the majority of your shot will be in focus, both the background and the foreground.
A small depth of field will reduce the amount of the photo that is in focus. The rest of the image will be blurred. A large aperture (which is represented by a smaller f/stop number) will give you a smaller depth of field, and vice versa.
Histograms
A histogram is a really useful tool that DSLR cameras have. It looks like a little bar chart and is a graphical representation of the pixels in your photo. If you read the histogram from left to right and it will show you the dark areas, mid-tone areas, and bright areas respectively.
The height of the bars on the histogram shows how many pixels are in that particular colour tone. For example, a histogram that is very skewed to the left is likely to represent an image that is too dark, or a histogram skewed to the right likely means it has been over-exposed, i.e. it's too light. An ideal histogram will be fairly balanced, without any high peaks at either edge.
ISO
Your ISO is one of the important settings on your camera which will allow you to brighten or darken your image. ISO stands for the ‘International Organization for Standardization’ and refers to the light sensitivity of the camera's internal sensor.
The higher the ISO, the brighter your image will appear. However, choosing a higher ISO number also creates more noise in your photo - meaning it will be less crisp and clear. You can also try other ways such as changing the shutter speed and aperture to adjust brightness, so it’s not always worth changing the ISO on your camera. A camera's typical ISO range may be between 100 and 2600 or 3200. As you double the ISO number, you double the brightness of your photo.
White Balance
White balance will remove discolouration in an image, to help all of the colours look realistic. The colours that show in your image can be affected by the type of light you are taking the picture in - for example, you might notice that the pictures that you take indoors tend to have a yellow hue, or that your camera flash might make images appear slightly blue. The white balance on your camera will help to eliminate this!
Understanding white balance
| Mode | Colour Temperature (Approx. K: Kelvin) |
| Auto | 3000 - 7000 |
| Daylight | 5200 |
| Shade | 7000 |
| Cloudy, sunset | 6000 |
| Tungsten light | 3200 |
| White flourescent light | 4000 |
| Flash use | 6000 |
| Custom | 2000 - 10000 |
| Colour temperature | 2500 - 10000 |
-
Share This


